List control
기능
리스트 컨트롤은 한 페이지에 모든 정보를 표시할 수 없을 경우 그리고 어떤 정보들이 일정한 속성으로 분류될 필요가 있을 때 자주 사용됩니다.
예
WiFi 리스트, device 리스트, table 정보 등
사용법
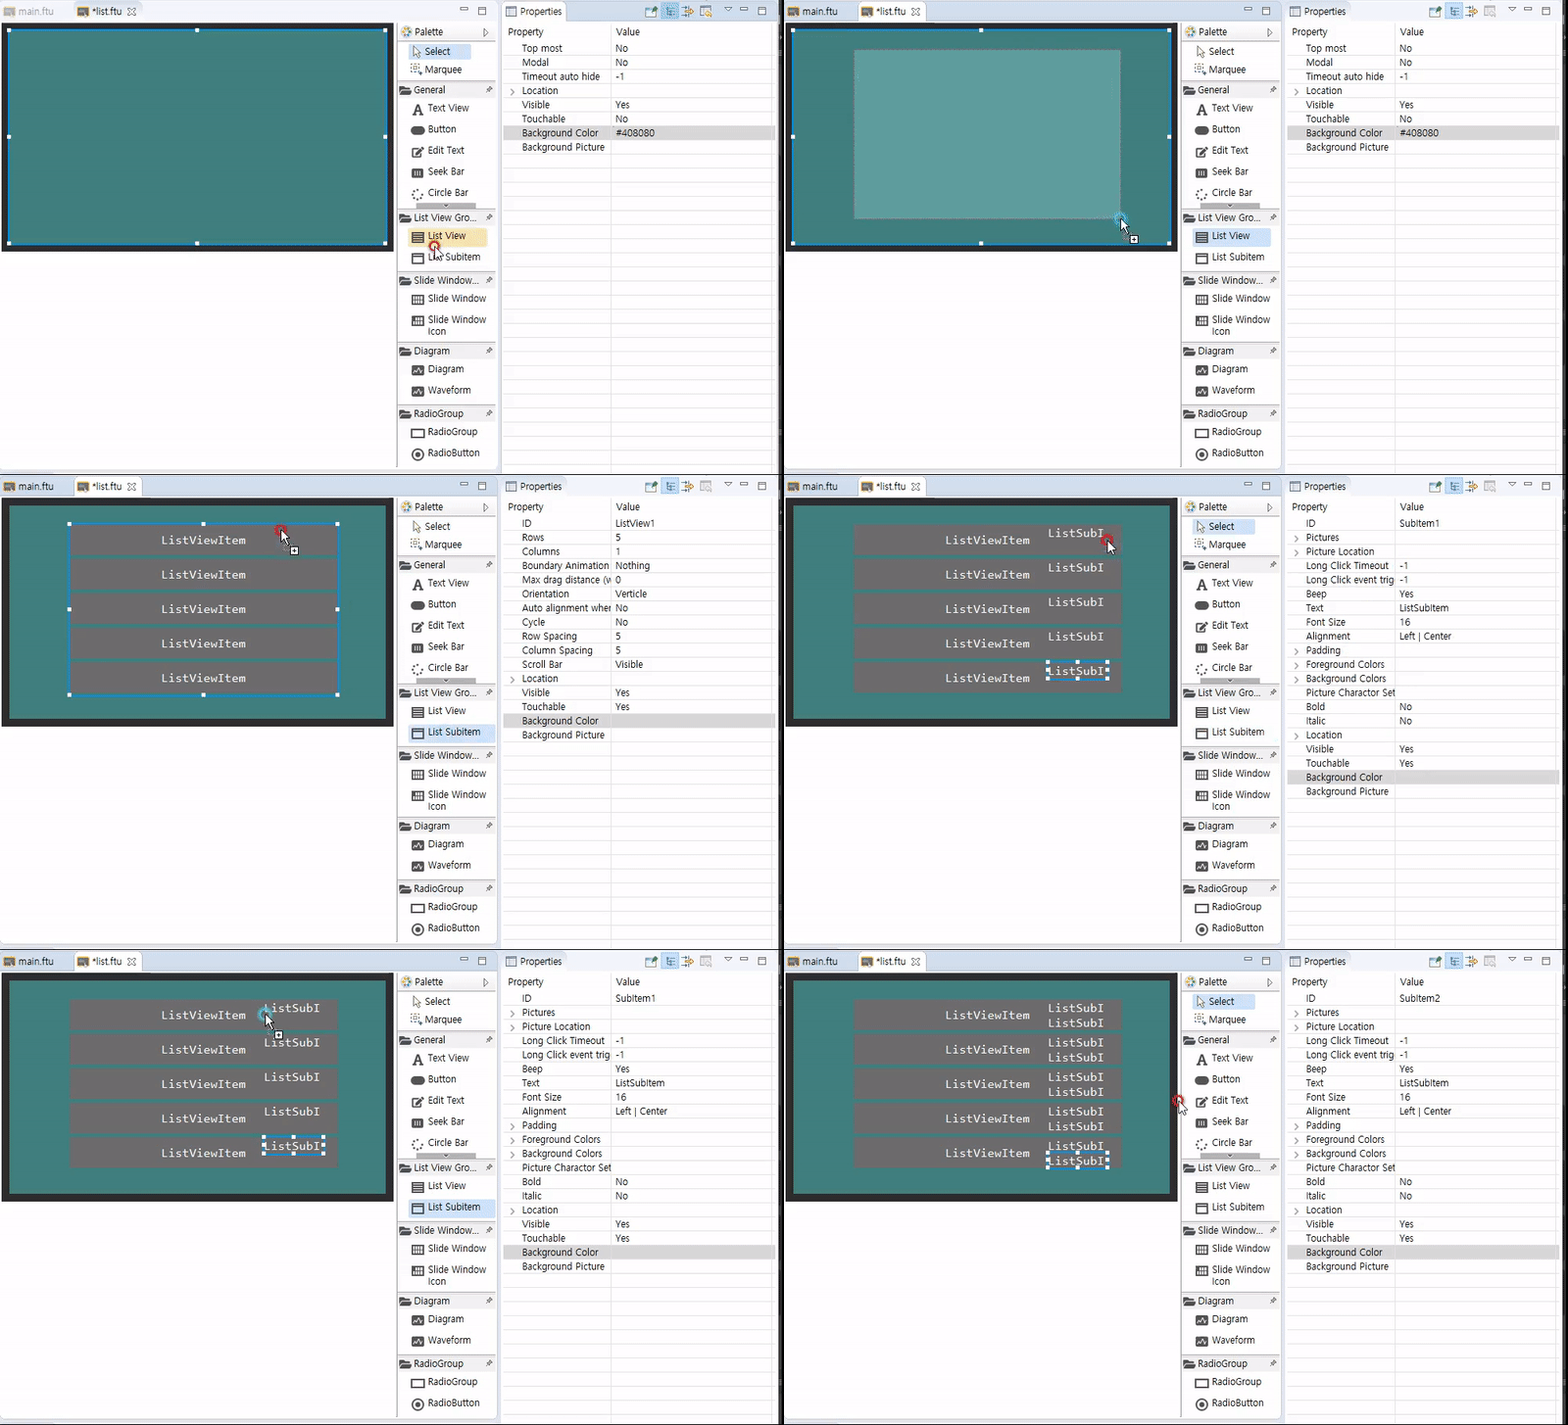
UI파일을 열어 List View컨트롤을 만듭니다. 그리고, 2개의 List Subitem컨트롤을 추가합니다.
아래는 동영상 예제입니다.
만들어진 리스트를 선택하면 아래와 같이 속성을 확인할 수 있습니다.

각각의 속성을 수정해보고 보드에 다운로드하여 어떻게 변하는지 확인해 볼 수 있습니다.
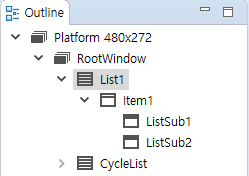
이제 Outline을 살펴보겠습니다.

먼저 List1을 보면 리스트의 행과 열을 나타내는 Item노드가 기본적으로 포함되고, 여기에는 추가했던 ListSub노드 2개가 포함된 것을 확인할 수 있습니다.
여기서 각 아이템 노드들을 클릭하면 속성 창에서 관련된 속성들과 그 속성이 영향을 미치는 범위를 에디터 영역의 프리뷰에서 확인 할 수 있습니다.
Note : 각 List View 컨트롤은 최대 32개의 List item을 가질 수 있습니다.Item과 List Subitem컨트롤은 Button컨트롤과 유사한 속성들을 가지고 있습니다. 개발자는 원하는 스타일에 맞게 해당 속성들을 수정할 수 있습니다. 아래는 예제를 이용해 수정한 결과입니다 :

UI파일에서 리스트의 전반적인 속성을 조정하여 표시되는 모양을 확인한 후 컴파일 하십시오(FlywizOS 프로젝트 컴파일). 그 후 자동으로 생성되는 상관 함수에 필요한 기능들을 추가 하십시오.
컴파일이 끝나면 해당하는 Logic.cc파일에 각 리스트 컨트롤과 관련된 3가지 함수가 생성될 것입니다.
int getListItemCount_ListView1(): 그려질 리스트 컨트롤의 아이템 수
예 : 100개의 아이템을 디스플레이 한다면, 100이 리턴됩니다.void obtainListItemData_List1: 리스트의 각 아이템에 표시될 컨텐츠를 설정
위 두 함수는 리스트의 컨텐츠를 공동으로 제어합니다.onListItemClick_List1: 리스트 컨트롤 클릭 이벤트 함수 리스트 상의 아이템을 클릭 시 시스템은 이 함수를 호출합니다. 그리고 파라미터로 현재 클릭된 리스트 아이템의 인덱스를 전달합니다.
List drawing 과정
리스트를 그리기를 원할 때, 시스템은 먼저 리스트에 총 몇 개의 아이템이 있는지 알 필요가 있고, 이를 위해 제공된
int getListItemCount_ListView1()함수를 통해 총 아이템 수를 획득하며, 그 수는 동적으로 획득 가능합니다. 따라서 프로그램이 동작하는 중, 필요에 따라 다른 값을 리턴함으로 리스트의 아이템 수를 동적으로 조정할 수 있습니다.그 후, 시스템은
int getListItemCount_ListView1()로 리턴된 수 만큼void obtainListItemData_ListView1(ZKListView *pListView,ZKListView::ZKListItem *pListItem, int index)함수를 호출하고, 호출 시 파라미터로 전달되는 포인터를 이용하여 각 아이템의 컨텐츠를 설정할 수 있습니다.Example 1. 리스트 아이템에 표시할 컨텐츠 설정
static void obtainListItemData_ListView1(ZKListView *pListView,ZKListView::ZKListItem *pListItem, int index) {
    //The pListItem pointer represents a list item, which can only be used in this function
    char buf[32] = {0};
    //The parameter index indicates which item of the list is currently drawn, starting from 0.
    //Here, we format the index value into a string
    snprintf(buf, sizeof(buf), "Item %d", index);
    //Display the string as text in the list item area
    pListItem->setText(buf);
    //If you have configured the list item "Picture when selected" in the ui file,
    //Then, by setting the selected state of the list item through the following line of code, you can control the list item to
    //display the corresponding state picture
    pListItem->setSelected(true);
}
Example 2. 리스트 서브 아이템에 표시할 컨텐츠 설정
만약 리스트 서브 아이템을 사용한다면 아래 방법처럼 리스트 아이템 컨트롤 포인터로부터 서브 아이템의 컨트롤 포인터를 획득해서 조정할 수 있습니다.static void obtainListItemData_ListView1(ZKListView *pListView,ZKListView::ZKListItem *pListItem, int index) { char buf[32] = {0}; //The parameter index indicates which item of the list is currently drawn, starting from 0. //Here, we format the index value into a string snprintf(buf, sizeof(buf), "The first child of item %d", index); //We can get the pointer of the list item through the findSubItemByID() function and the ID of the list item //Same as the pListItem pointer, the list item pointer that is found can only be used in this function ZKListView::ZKListSubItem* subitem1 = pListItem->findSubItemByID(ID_MAIN_SubItem1); if (subitem1 != NULL) { //Set the text of list item 1 subitem1->setText(buf); } snprintf(buf, sizeof(buf), "The second child of item %d", index); ZKListView::ZKListSubItem* subitem2 = pListItem->findSubItemByID(ID_MAIN_SubItem2); if (subitem2 != NULL) { //Set the text of list item 2 subitem2->setText(buf); } }
리스트의 수정
FlywizOS 시스템에서 리스트는 일련의 규칙적인 데이터의 매핑입니다. 만약 데이터를 추가하거나 특정 아이템을 수정하는 것처럼 리스트를 수정하기 원한다면 먼저 데이터를 수정하고 리스트를 갱신해야 합니다. 그러면 시스템은 자동적으로 obtainListItemData_ListView1함수를 호출하고, 이 함수로 최종적으로 수정된 데이터에 따라 리스트를 갱신합니다.
이러한 과정은 아래 예제에 반영되어 있습니다.
예제 코드
예제 코드의 ListViewDemo 프로젝트를 참고하십시오.
예제 설명
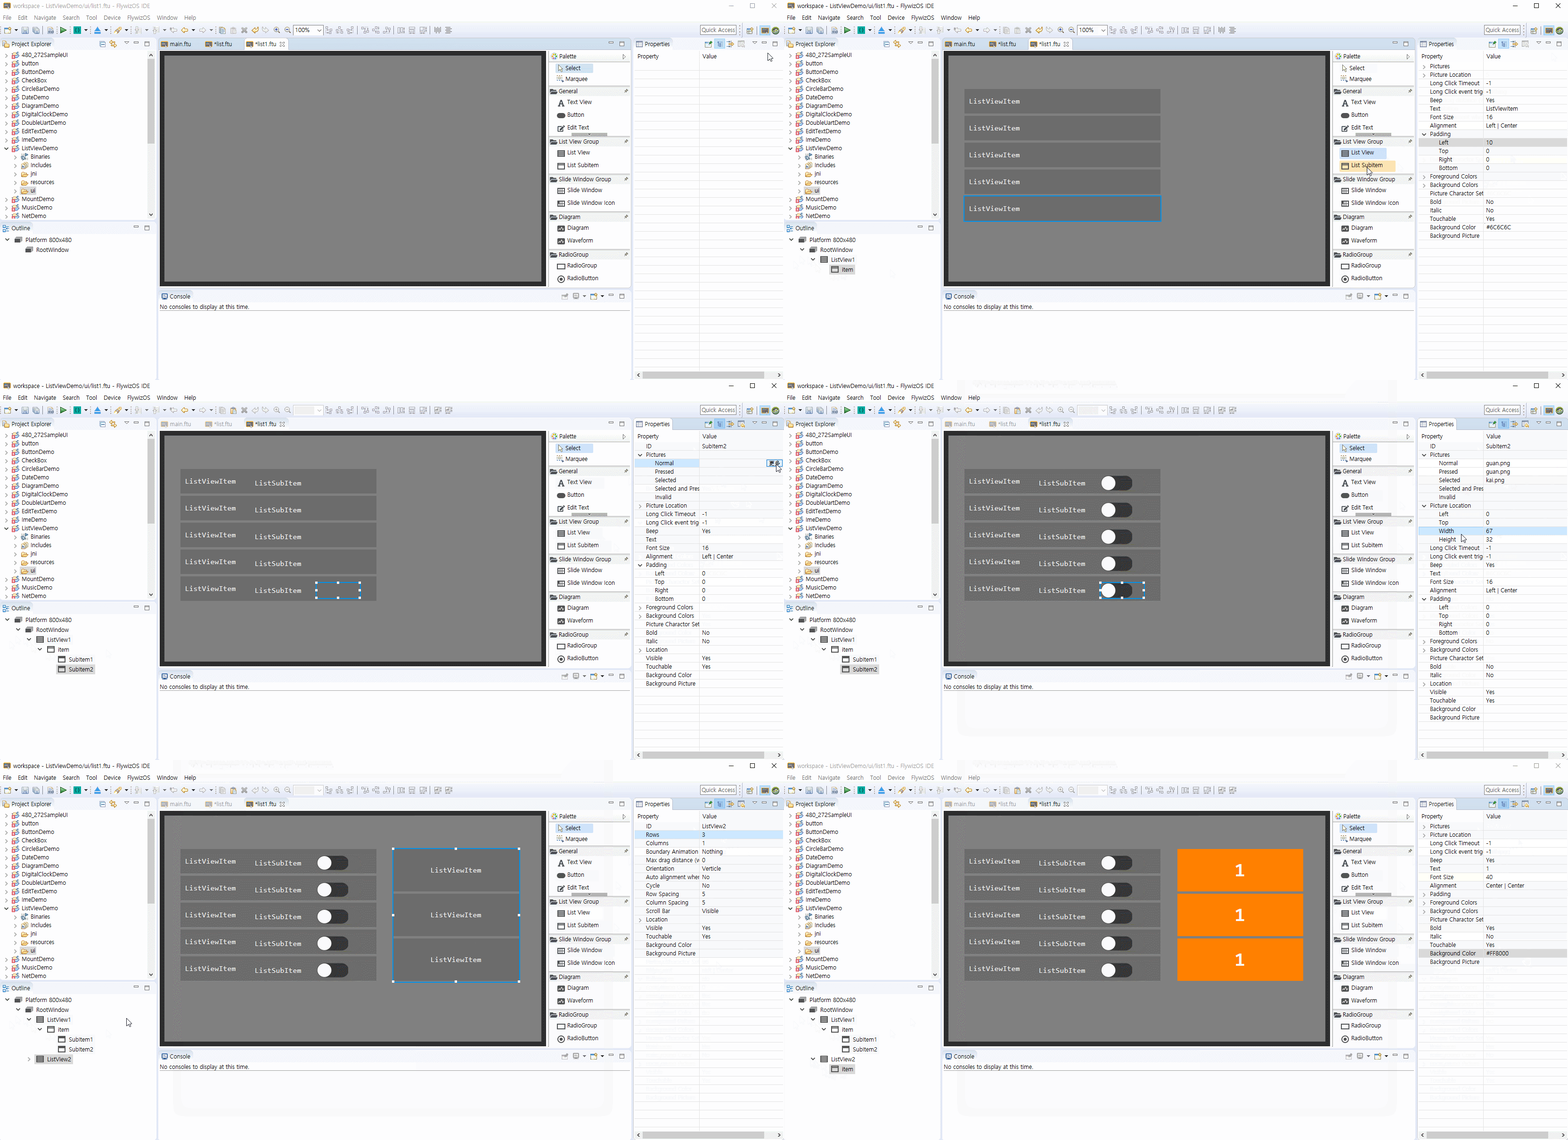
List View 컨트롤을 생성
서로 다른 속성을 가지는 2개의 List View 컨트롤을 만듭니다.
Cycle List control : Cycle 속성을 on 합니다.
프로젝트 컴파일
이 단계는 Logic.cc 파일에 자동으로 List View컨트롤과 관련된 함수를 생성합니다.
"FlywizOS 프로젝트 컴파일"을 참고하십시오.List1 리스트 생성에 필요한 데이터 구조체 설정
일반적으로 리스트의 각 아이템을 위한 모델로 구조체를 정의합니다.typedef struct { //The text displayed in the list item const char* mainText; //The text to be displayed in list sub item 1 const char* subText; //Turn on/off logo bool bOn; } S_TEST_DATA;가상의 리스트 데이터를 위한 구조체 배열을 정의합니다.
static S_TEST_DATA sDataTestTab[] = {
   { "Test1", "testsub1", false },
   { "Test2", "testsub2", false },
   { "Test3", "testsub3", false },
   { "Test4", "testsub4", true },
   { "Test5", "testsub5", false },
   { "Test6", "testsub6", true },
   { "Test7", "testsub7", false },
   { "Test8", "testsub8", false },
   { "Test9", "testsub9", false },
   { "Test10", "testsub10", false },
   { "Test11", "testsub11", false }
};
자동으로 생성된 리스트 관련 함수에 코드를 추가합니다.
static int getListItemCount_List1(const ZKListView *pListView) { //Use the length of the array as the length of the list return sizeof(sDataTestTab) / sizeof(S_TEST_DATA); } static void obtainListItemData_List1(ZKListView *pListView,ZKListView::ZKListItem *pListItem, int index) { //Get the pointer of the list sub item 1 and name it psubText ZKListView::ZKListSubItem* psubText = pListItem->findSubItemByID(ID_MAIN_ListSub1); //Get the pointer of the list sub item 2 and name it psubButton ZKListView::ZKListSubItem* psubButton = pListItem->findSubItemByID(ID_MAIN_ListSub2); pListItem->setText(sDataTestTab[index].mainText); //Take index as the subscript, get the corresponding structure from the array, get the text that needs to be displayed //from the structure, and finally set it to the corresponding list item psubText->setText(sDataTestTab[index].subText); //In the UI file, we set the selected image property for the list sub item 2 //Here, according to the `bOn` value of the structure, the selected state of the list item is set, so that if the member //`bOn` is true, it is set to be selected, and the system will automatically display the selected picture previously set psubButton->setSelected(sDataTestTab[index].bOn); } static void onListItemClick_List1(ZKListView *pListView, int index, int id) { //When you click the index item in the list, modify the bOn variable to reverse bOn. In this way, every time you click on //the list, the picture will switch once //Note that the operation of picture switching is completed in the obtainListItemData_List1 function, and now we only //modify the value of this variable. sDataTestTab[index].bOn = !sDataTestTab[index].bOn; //The last sentence of code modified the structure data, and now we want to refresh the list immediately, and call //refreshListView to force a refresh //After the refresh is triggered, the system will call the two functions getListItemCount_List1 and //obtainListItemData_List1 again, so that the modified data corresponds to the list display. mList1Ptr->refreshListView(); }- 코드 추가가 완료되면 다운로드하여 실행 후 결과를 확인합니다.